How to add a beneficiary in the Dashboard, whether you are paying out to a bank account, an e-wallet, or a crypto wallet, and how the payout then works.
A beneficiary is someone your customer pays out to. You add them once, and from then on you can send money to them as often as you need.Every beneficiary belongs to a customer and has a single destination. Pick the tab below for the kind of payout you are setting up.
Beneficiaries belong to a customer, so the customer has to exist and be approved first. You cannot add a beneficiary to a customer who is still under review.
2
The recipient's details to hand
You will be asked for the recipient’s name, address, destination details, and some compliance information. Collect them before you start, since every field marked with an asterisk has to be filled in before the form can be saved.
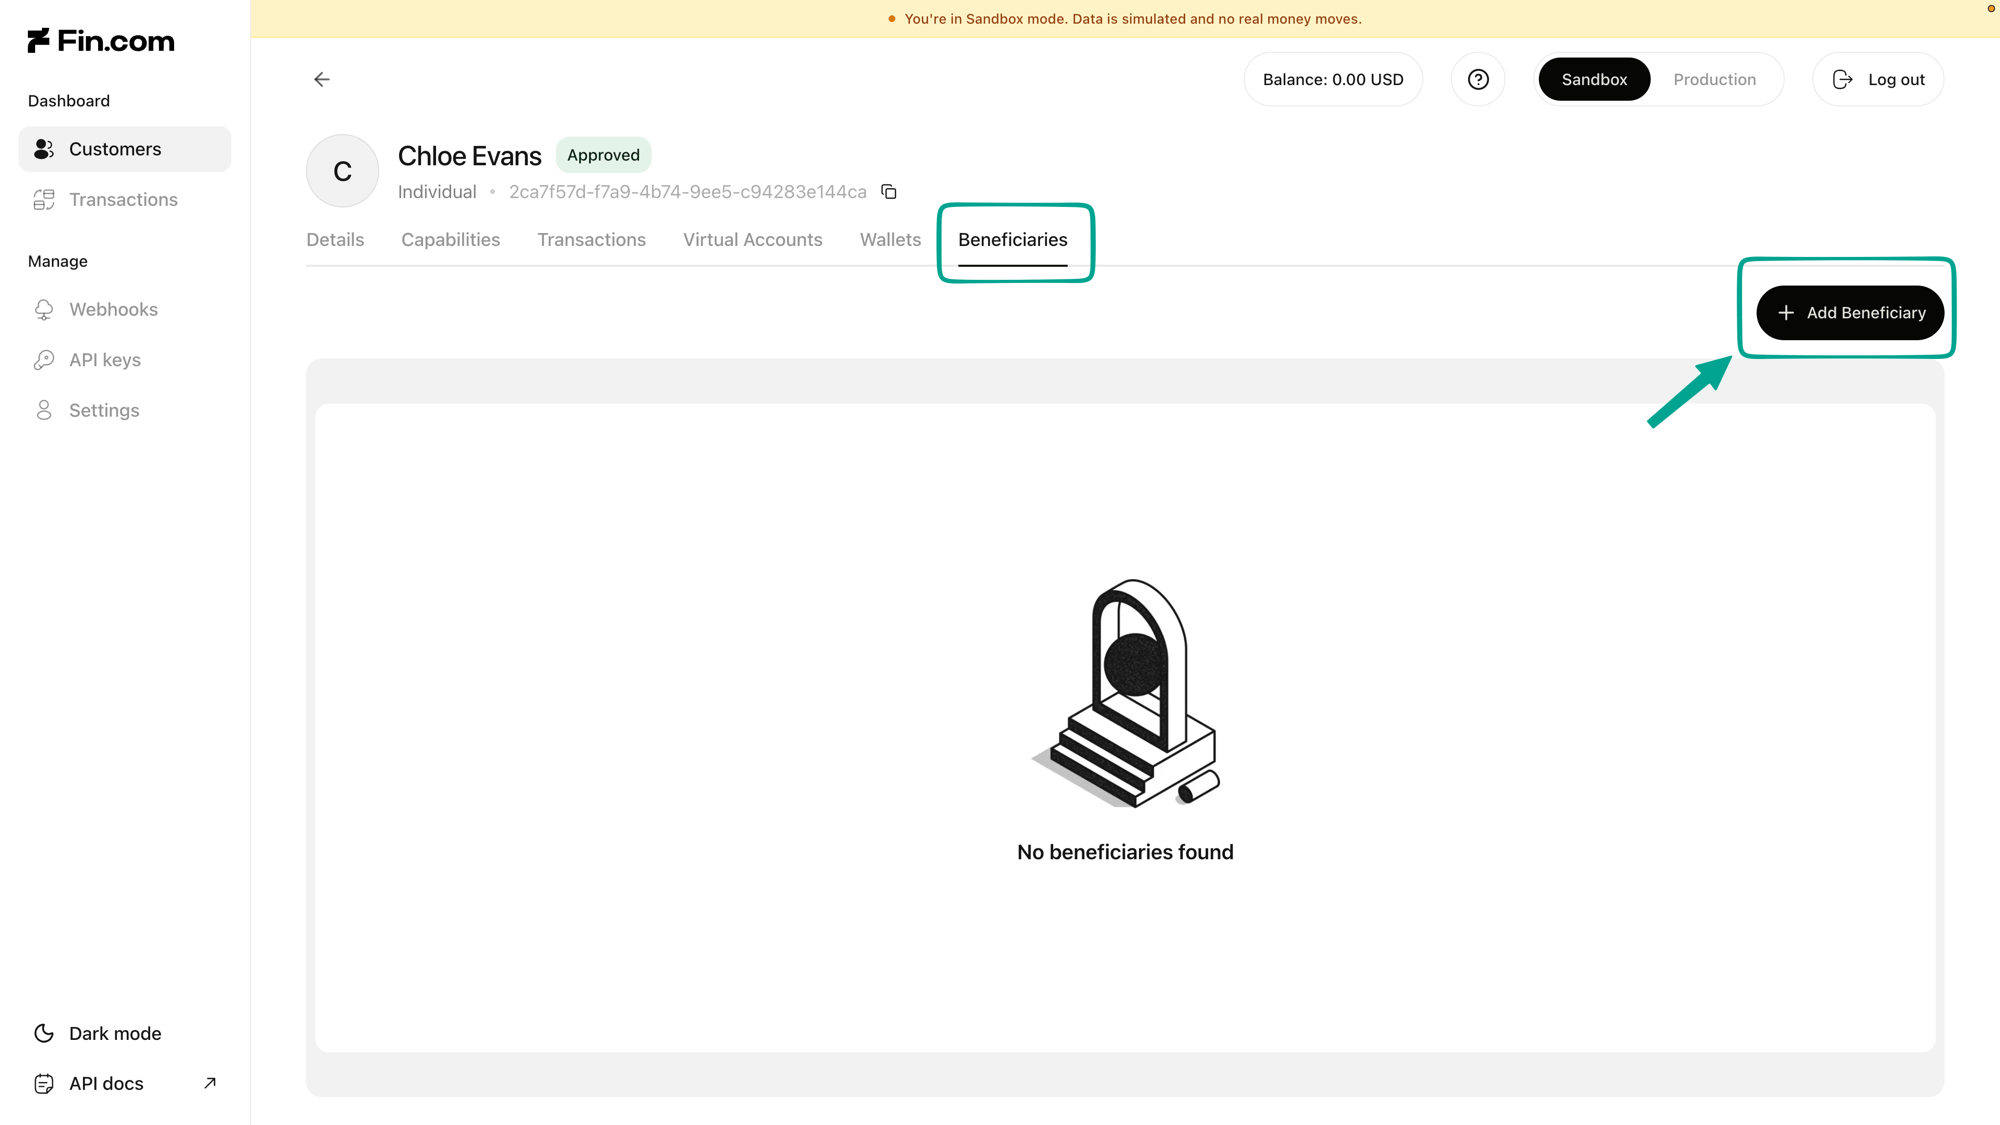
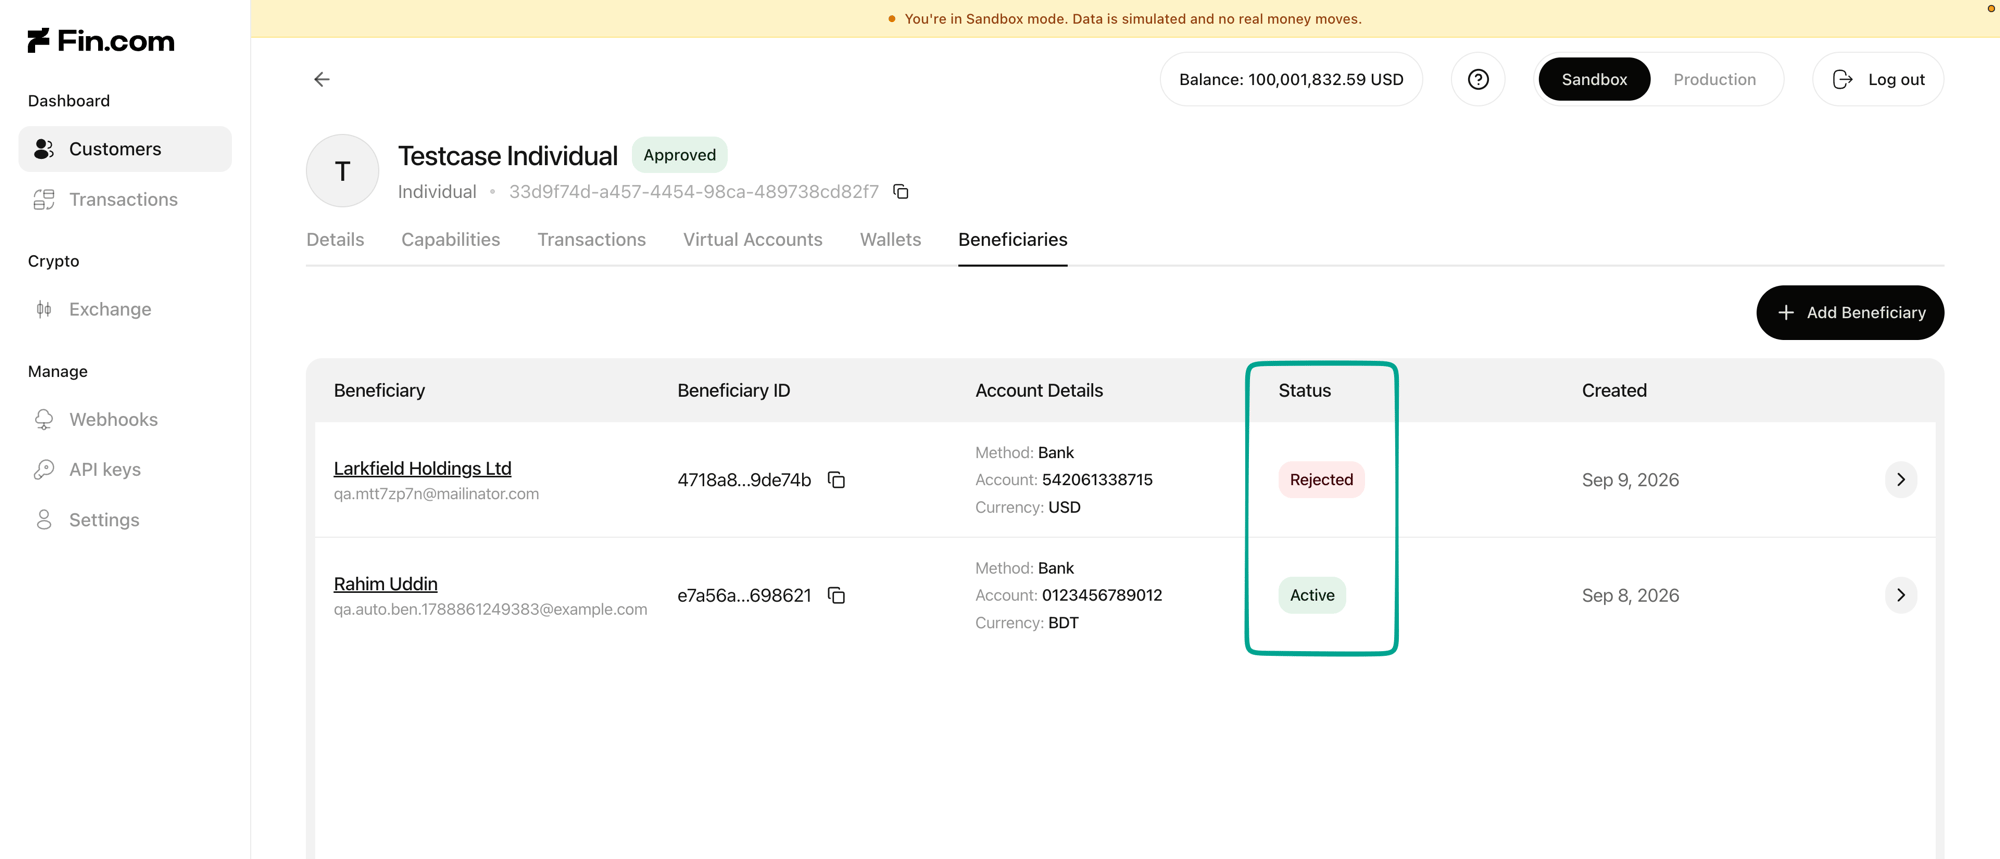
Go to Customer details for the customer you want the beneficiary for, open the Beneficiaries tab, then select Add Beneficiary.
The Beneficiaries tab on a customer's details
2
Select the destination type
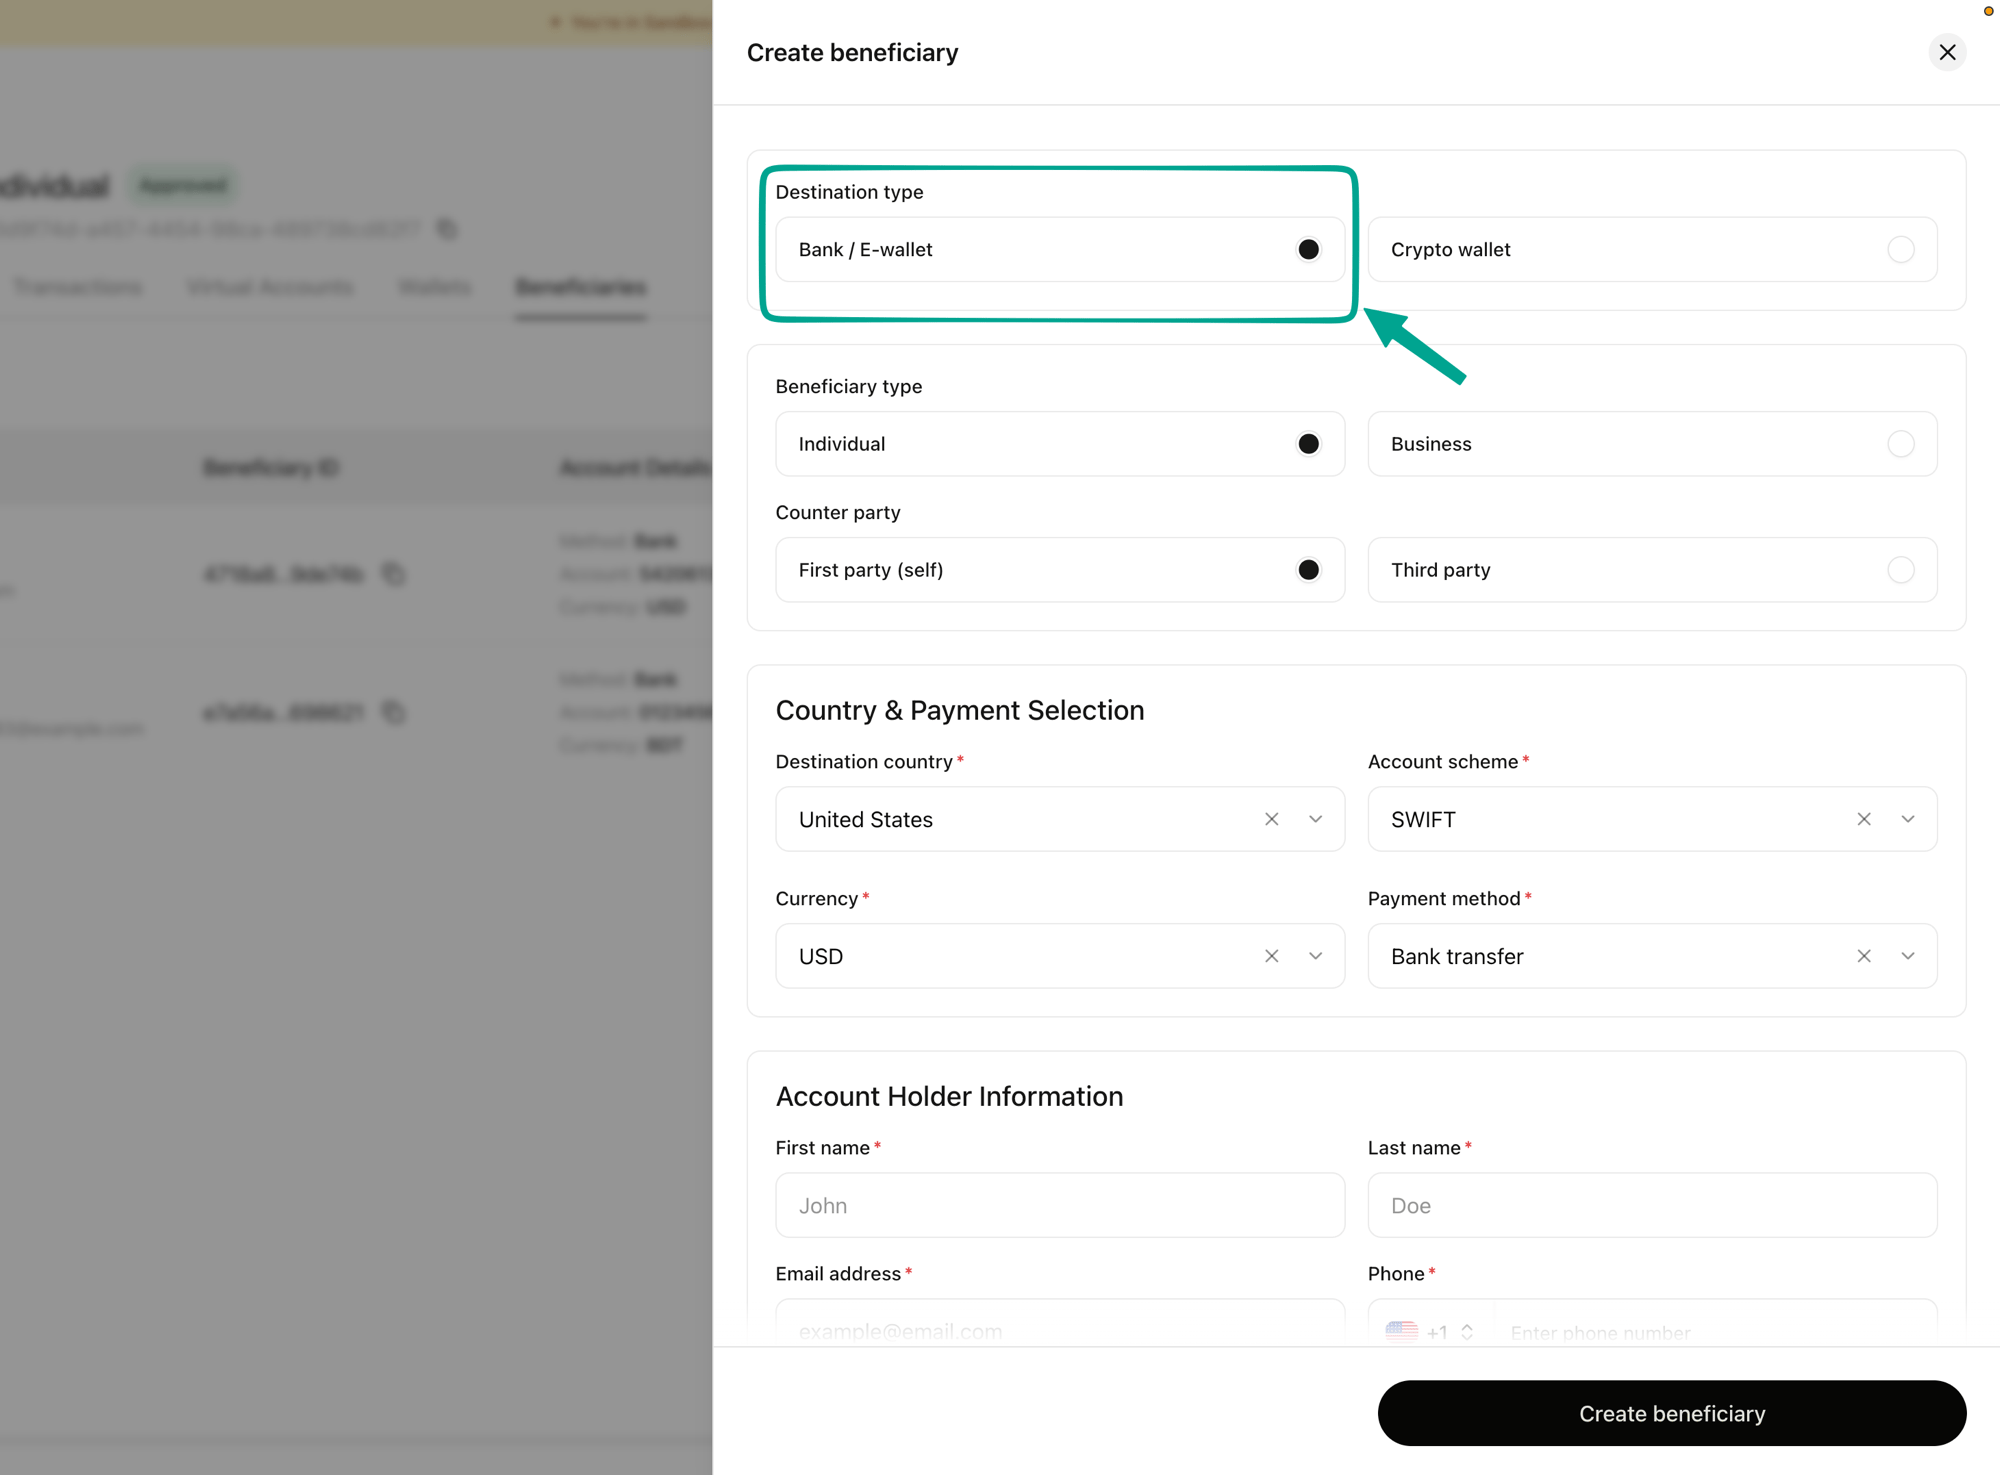
Choose Bank / E-wallet.
Choosing the destination type
3
Set the beneficiary type and counter party
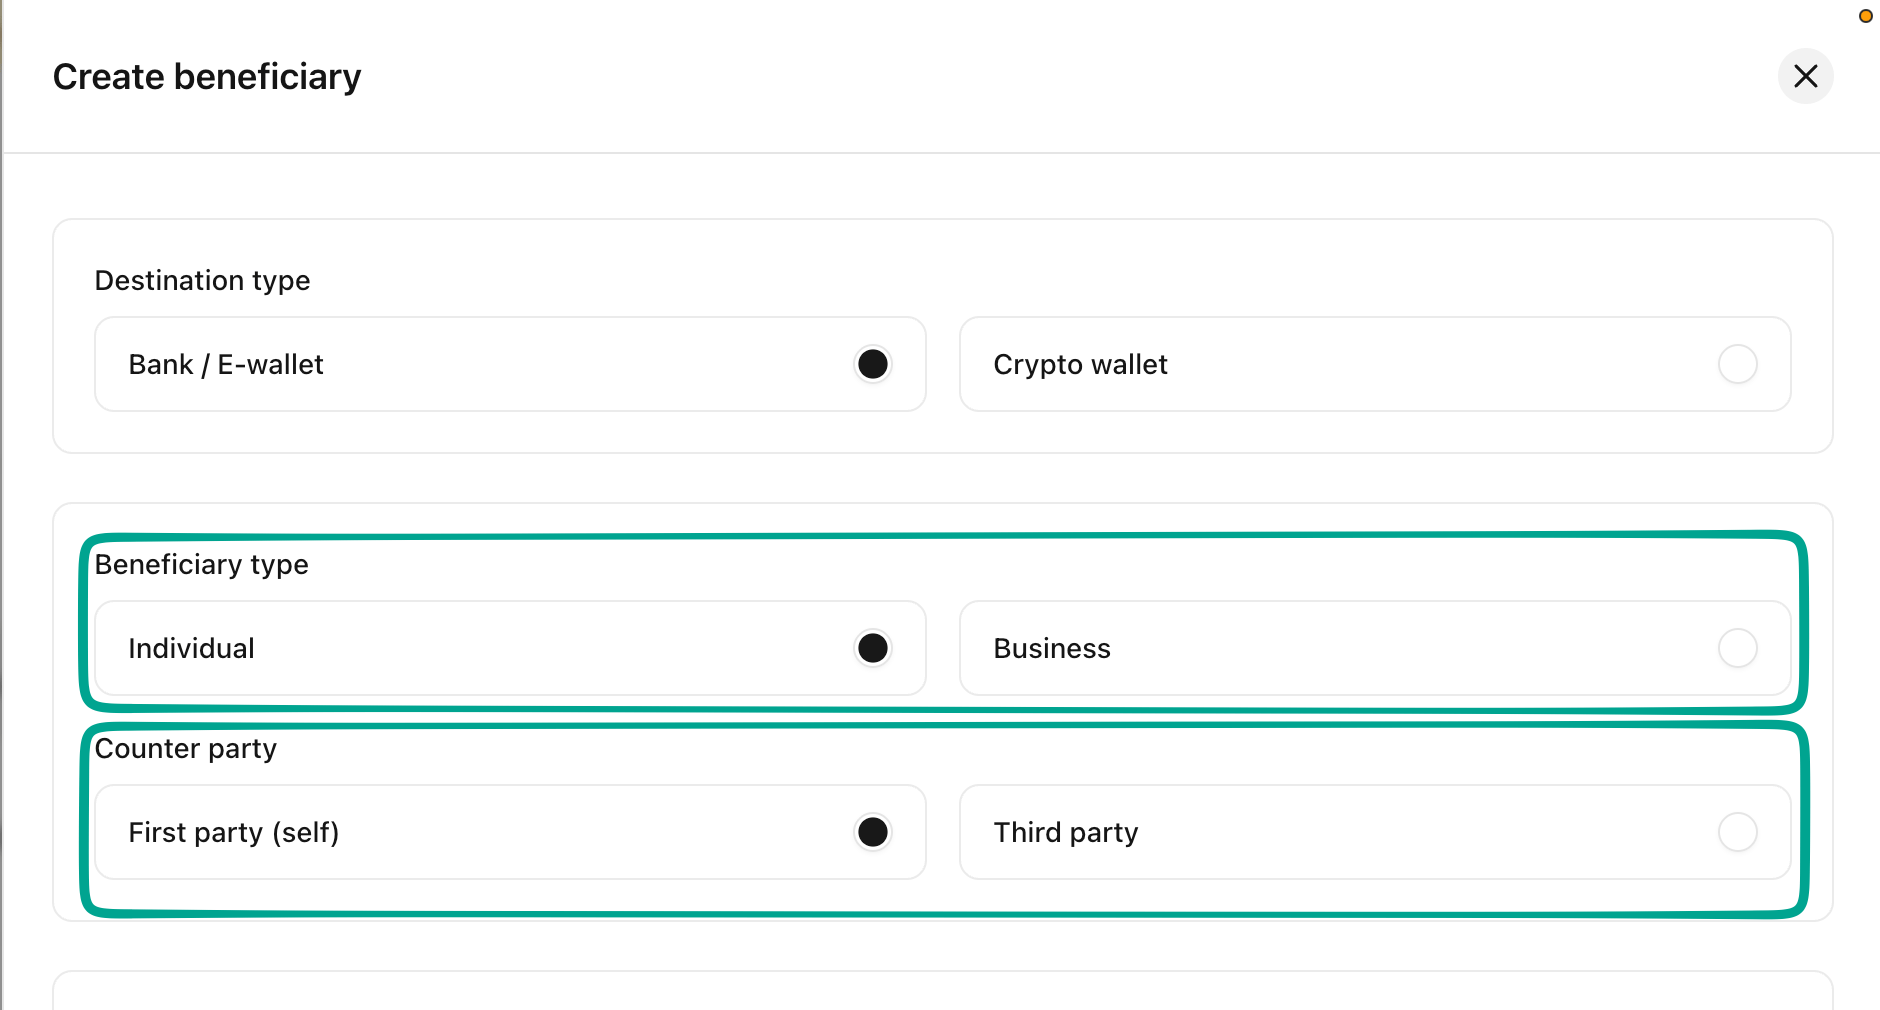
Beneficiary type says whether the recipient is an Individual or a Business.Counter party says who your customer is paying. First party (self) means they are paying themselves, such as a business sending funds to its own account elsewhere. Third party means they are paying someone else, such as a supplier or an employee. This drives the compliance checks, and third party payouts may bring extra ones depending on the country.
Setting the beneficiary type and counter party
4
Choose the country and payment method
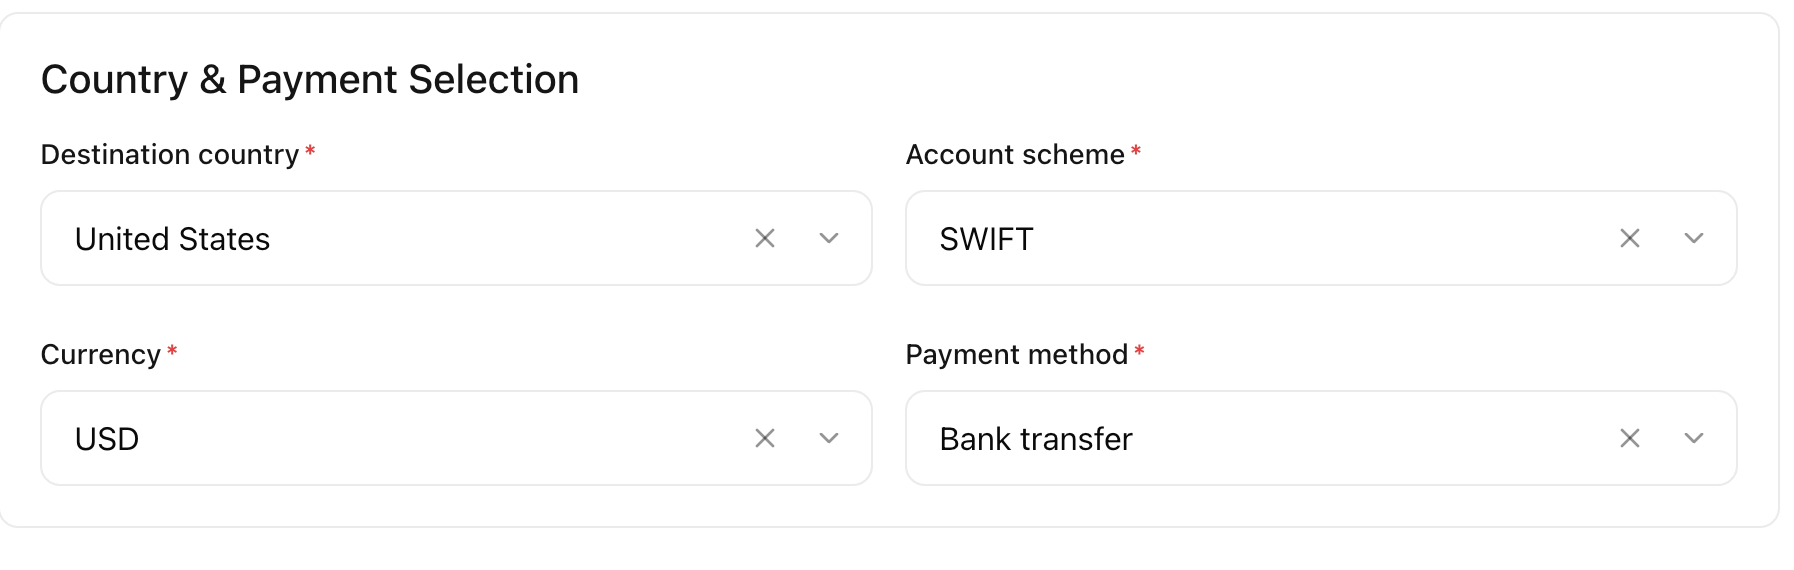
Under Country & Payment Selection, set the Destination country, the Account scheme, the Currency, and Bank transfer as the Payment method.
Country and payment selection for a bank transfer
5
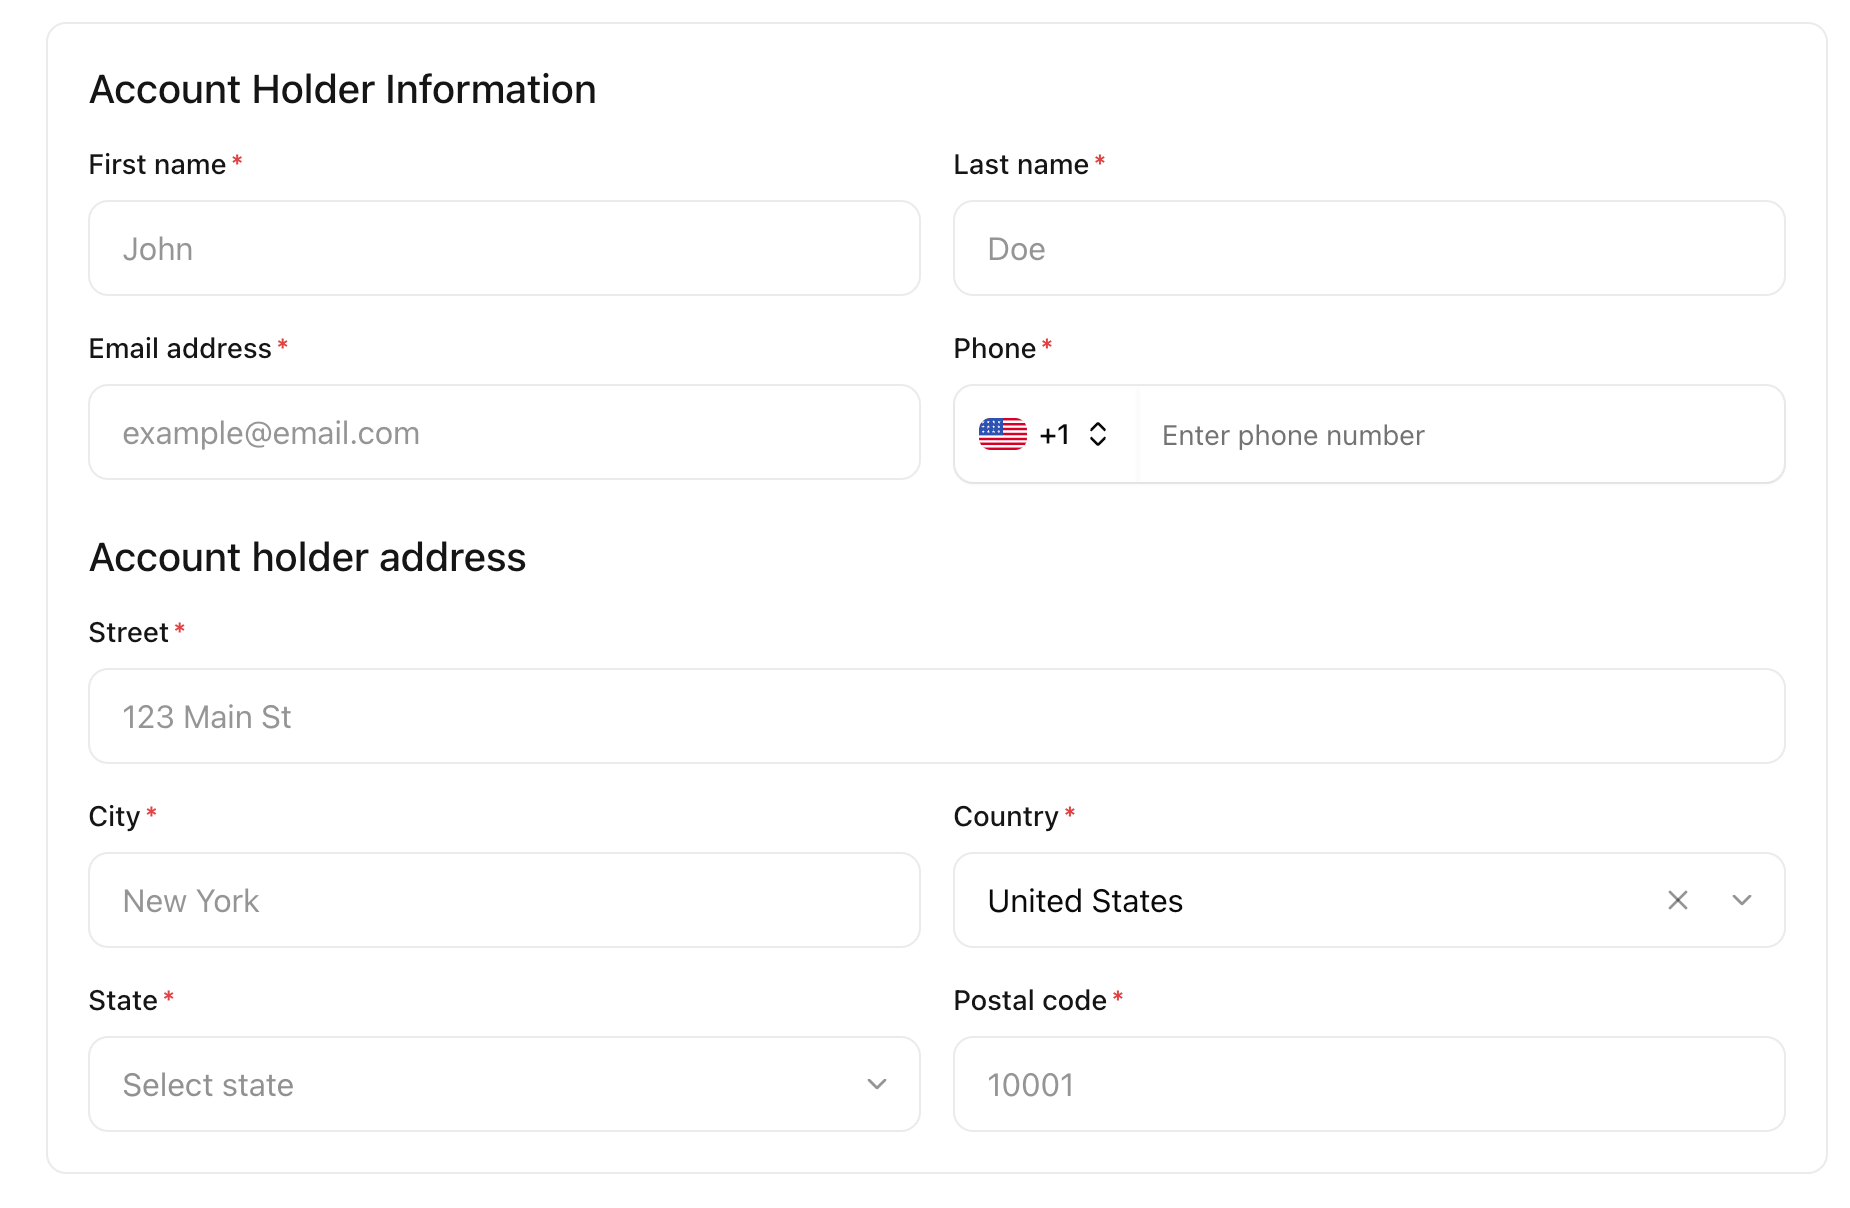
Fill in the account holder information
Give the recipient’s First name, Last name, Email address, and Phone, then their Account holder address: street, city, country, state, and postal code.
Account holder information and address
6
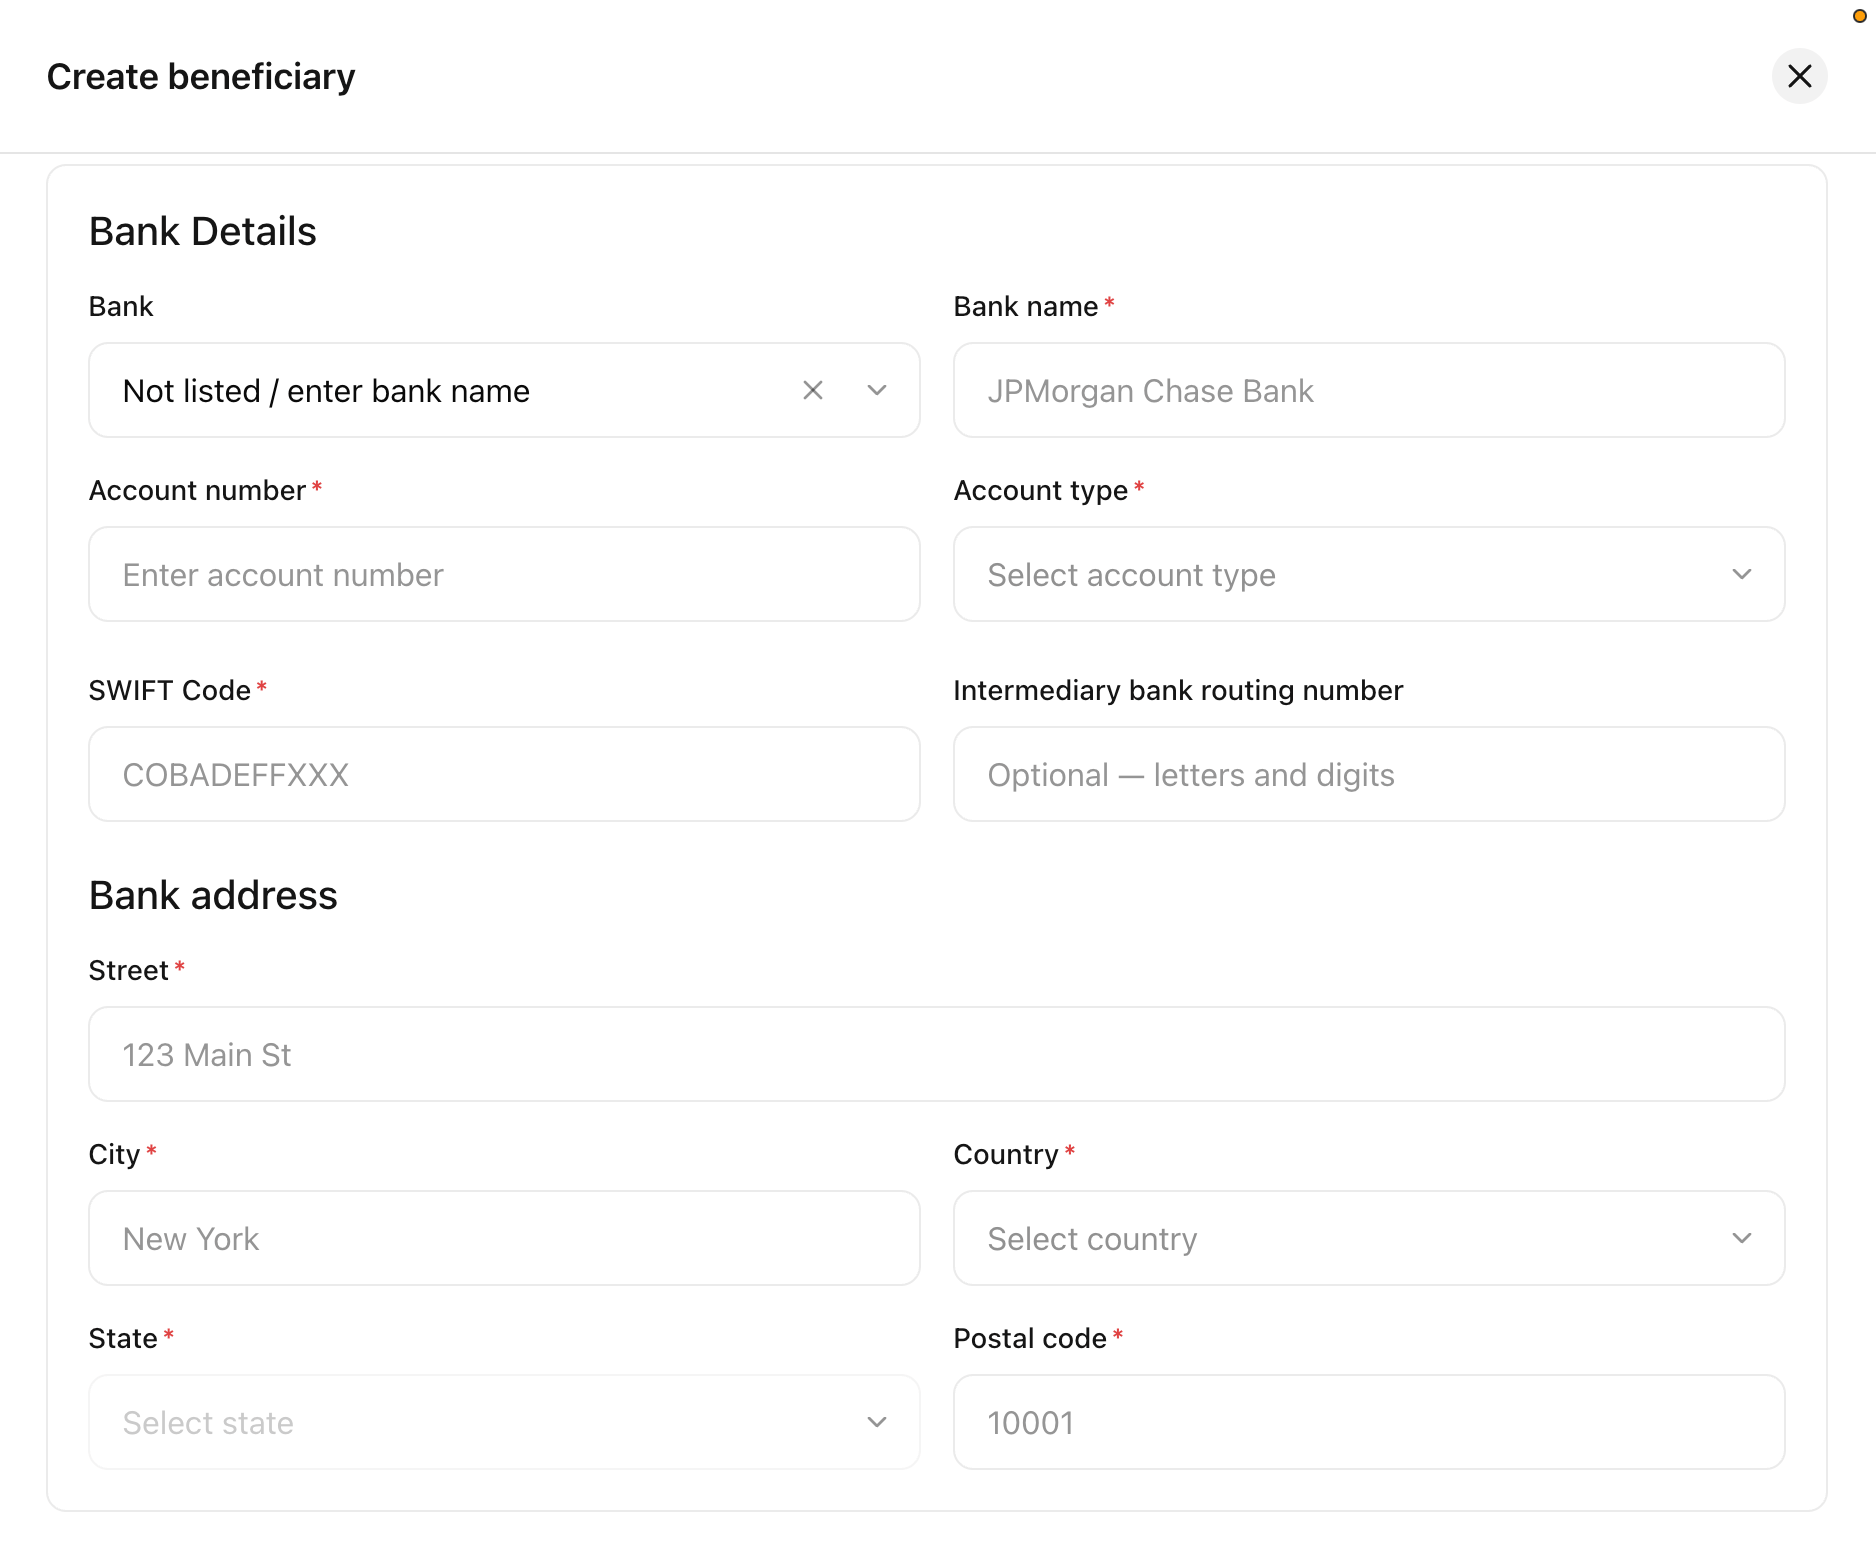
Add the bank details
Pick the receiving bank from the Bank list. If it is not there, choose Not listed / enter bank name and type the Bank name yourself. Then give the Account number and Account type.The remaining fields depend on the account scheme you chose, because countries identify a bank in different ways. On a SWIFT payout you are asked for the SWIFT Code and, optionally, an Intermediary bank routing number.Then give the Bank address: street, city, country, state, and postal code.
Bank details and bank address
Bank details are validated against the rules for the destination country, so a number in the wrong format is rejected when you save. See Bank account and routing number validation rules for what each country expects.
7
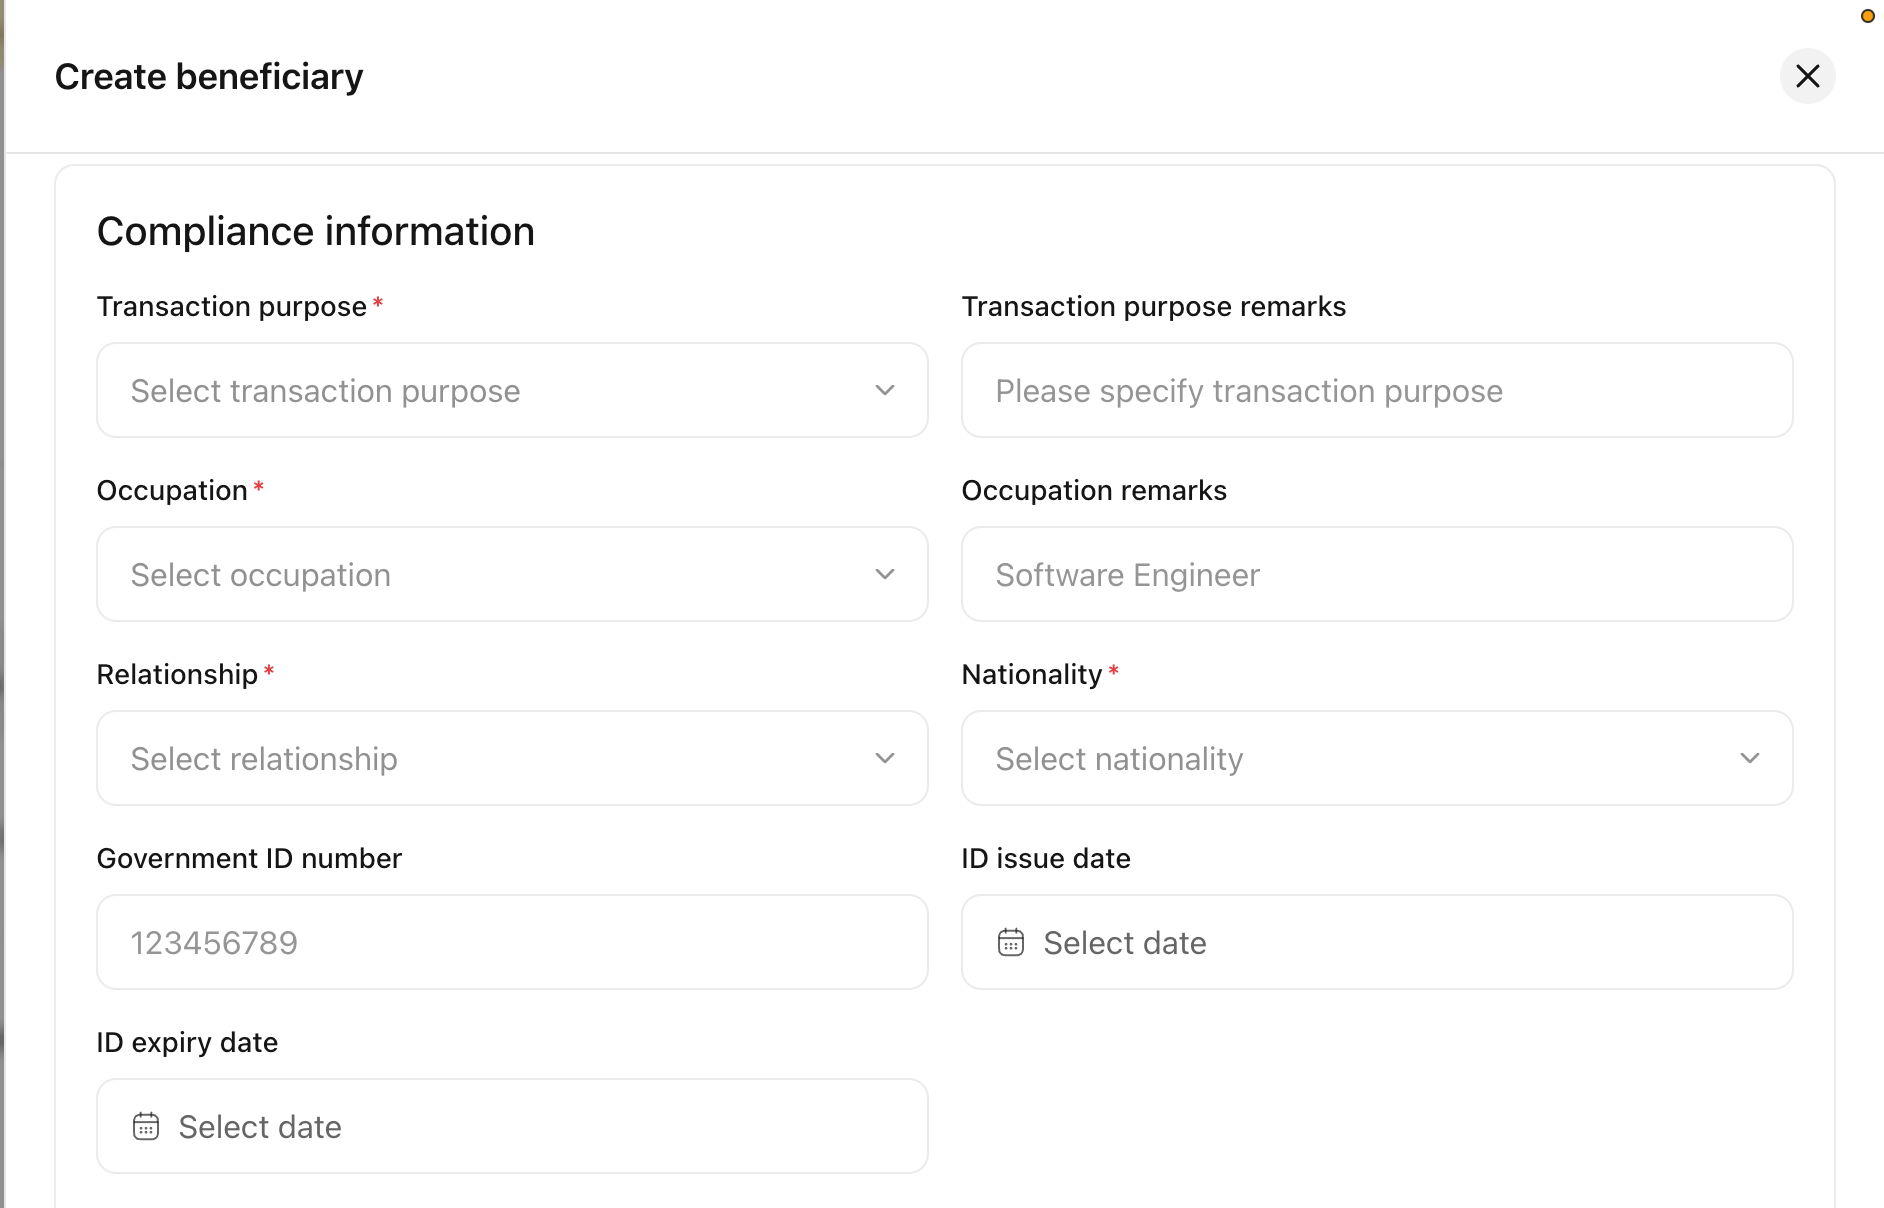
Complete the compliance information
Give the Transaction purpose, Occupation, Relationship, and Nationality, plus the Government ID number with its issue and expiry dates. The purpose and occupation each take optional remarks.The relationship options change depending on whether your customer and the recipient are individuals or businesses. See Sender and receiver relationships for which combinations are allowed.
The compliance information section
8
Set your fee
Under Developer fee, set what you charge on top of each payout. You can set a Fixed fee, a Percentage fee, or both. When you set both, they are added together.
The developer fee section
9
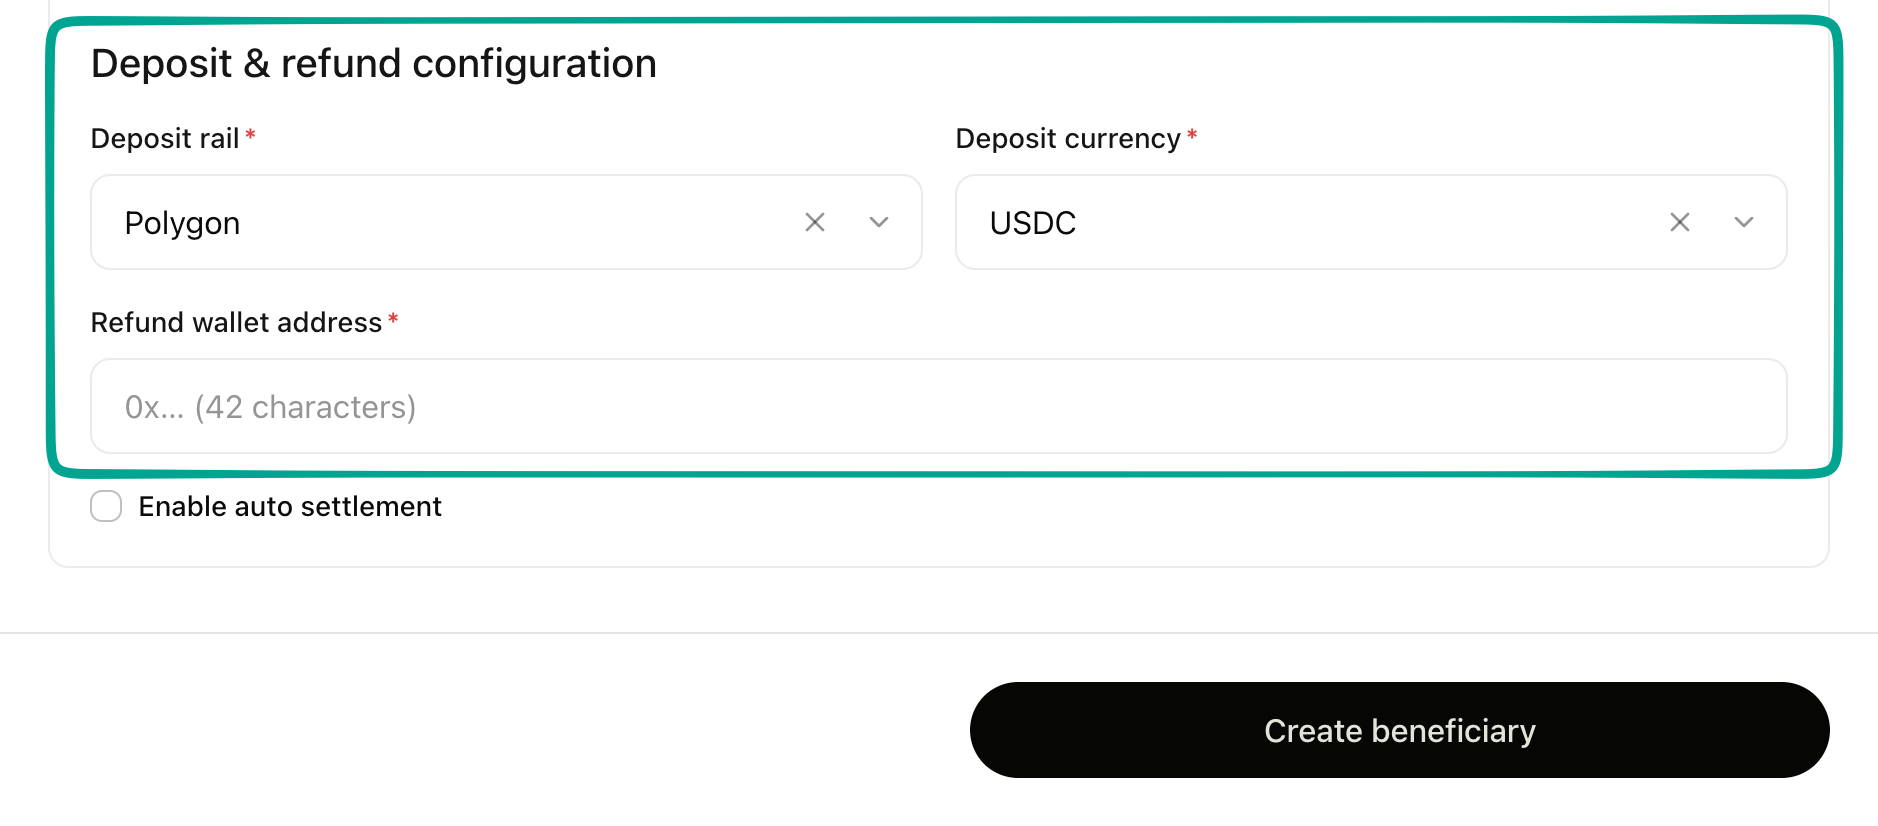
Configure the deposit and refund
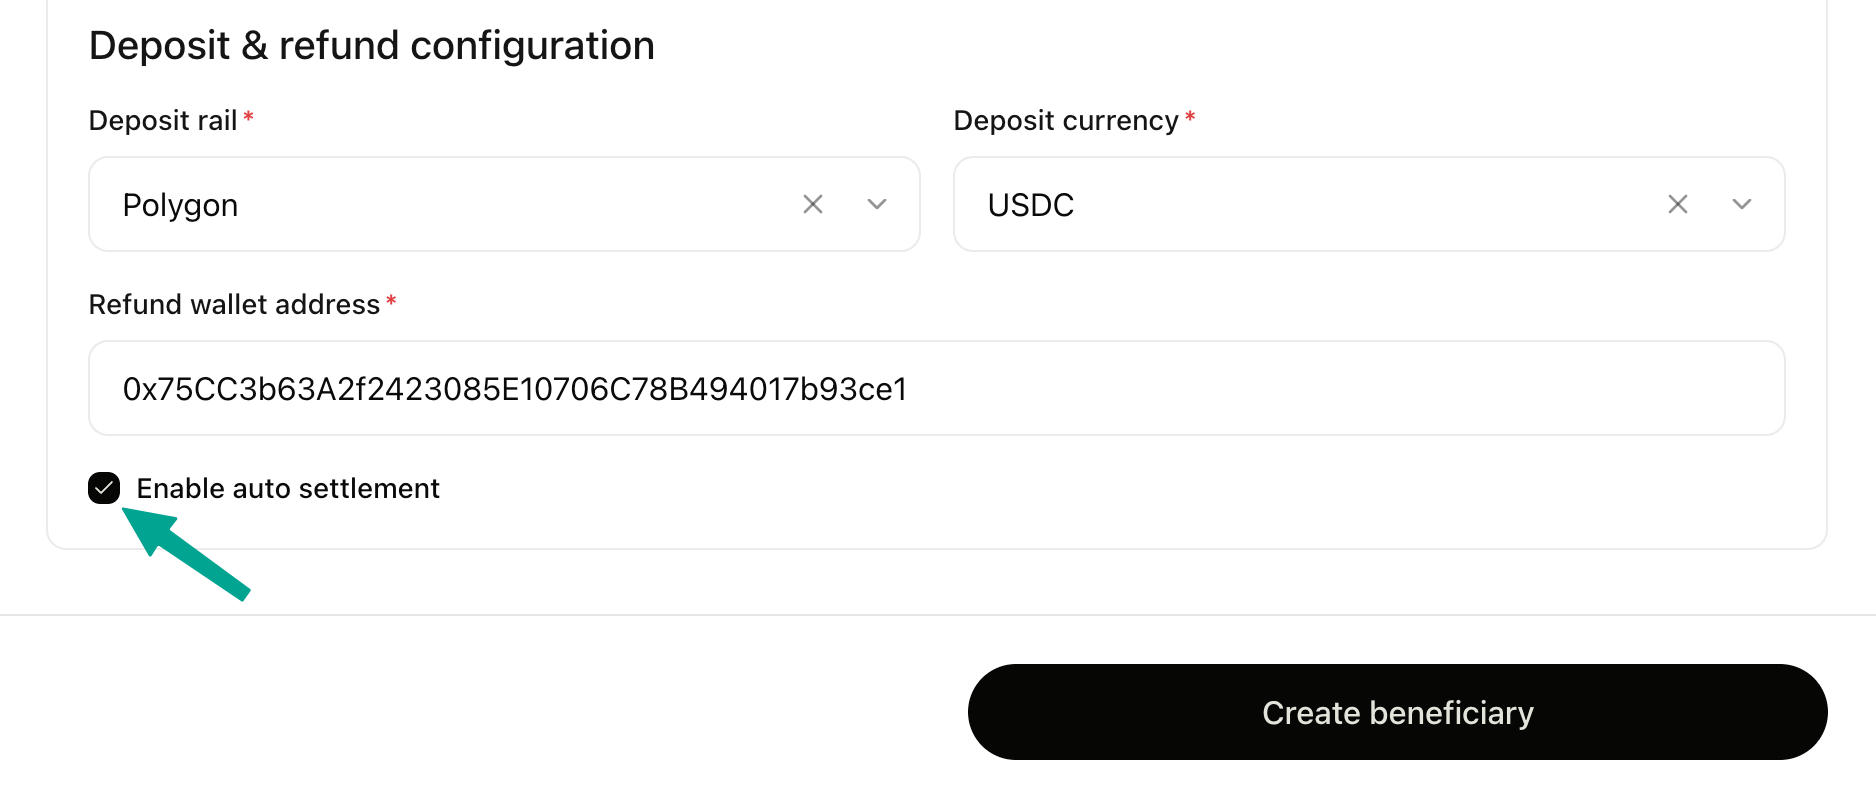
This is how the payout gets funded. Deposit rail and Deposit currency are the network and token you send in. Refund wallet address is where funds are returned if a payout cannot be completed.
The deposit and refund configuration
Enable auto settlement controls when the payout goes out. Leave it on and the payout is sent as soon as the funds arrive. Leave it off and the funds are held until you release them yourself.
Enabling auto settlement
Local currency payouts, such as BDT, INR, and EUR, have to be pre-funded. See Funding your balance for how that works.
10
Create the beneficiary
Select Create beneficiary to submit.
1
Open the customer
Go to Customer details for the customer you want the beneficiary for, open the Beneficiaries tab, then select Add Beneficiary.
The Beneficiaries tab on a customer's details
2
Select the destination type
Choose Bank / E-wallet.
Choosing the destination type
3
Set the beneficiary type and counter party
Beneficiary type says whether the recipient is an Individual or a Business.Counter party says who your customer is paying. First party (self) means they are paying themselves. Third party means they are paying someone else. This drives the compliance checks, and third party payouts may bring extra ones depending on the country.
Setting the beneficiary type and counter party
4
Choose the country and payment method
Under Country & Payment Selection, set the Destination country, the Currency, and E-Wallet as the Payment method. There is no account scheme to choose.
5
Fill in the account holder information
Give the recipient’s First name, Last name, Email address, and Phone, then their Account holder address: street, city, country, state, and postal code.
Account holder information and address
6
Add the e-wallet details
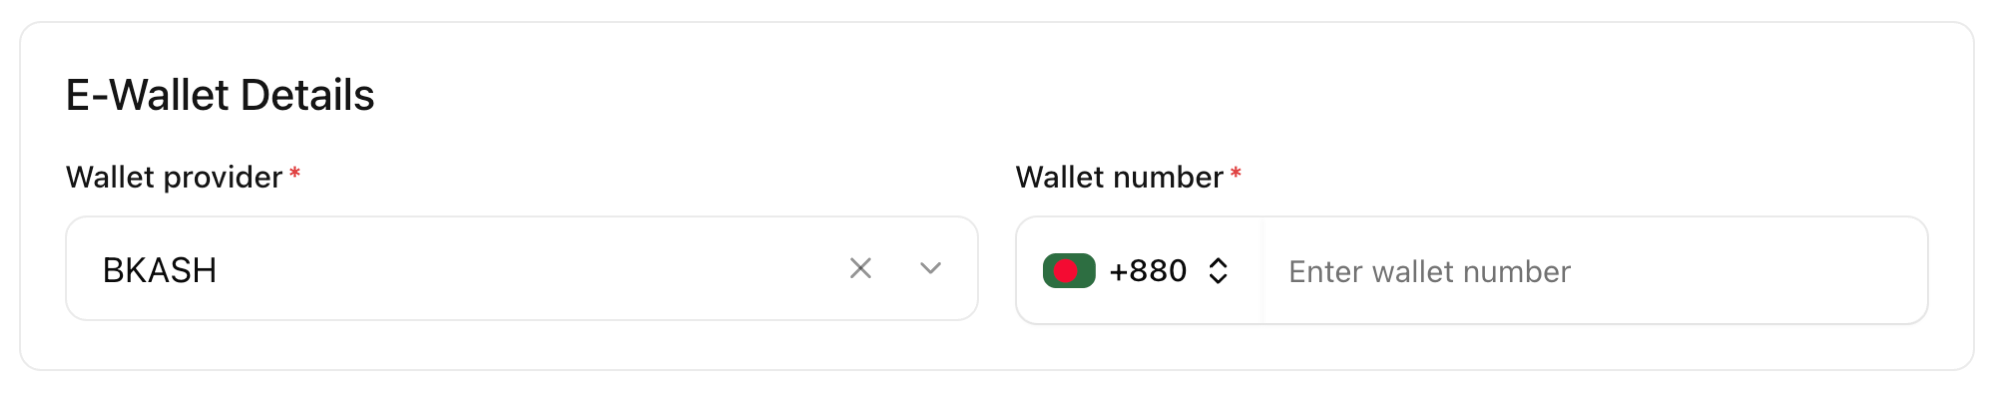
Give the Wallet provider, chosen from the providers supported in that country, and the Wallet number, which is usually the phone number the wallet is registered to.That is all an e-wallet needs. There is no bank name, bank code, or bank address to fill in.
The e-wallet details
7
Complete the compliance information
Give the Transaction purpose, Occupation, Relationship, and Nationality, plus the Government ID number with its issue and expiry dates. The purpose and occupation each take optional remarks.The relationship options change depending on whether your customer and the recipient are individuals or businesses. See Sender and receiver relationships for which combinations are allowed.
The compliance information section
8
Set your fee
Under Developer fee, set what you charge on top of each payout. You can set a Fixed fee, a Percentage fee, or both. When you set both, they are added together.
The developer fee section
9
Configure the deposit and refund
This is how the payout gets funded. Deposit rail and Deposit currency are the network and token you send in. Refund wallet address is where funds are returned if a payout cannot be completed.
The deposit and refund configuration
Enable auto settlement controls when the payout goes out. Leave it on and the payout is sent as soon as the funds arrive. Leave it off and the funds are held until you release them yourself.
Enabling auto settlement
Local currency payouts, such as BDT, INR, and EUR, have to be pre-funded. See Funding your balance for how that works.
10
Create the beneficiary
Select Create beneficiary to submit.
1
Open the customer
Go to Customer details for the customer you want the beneficiary for, open the Beneficiaries tab, then select Add Beneficiary.
The Beneficiaries tab on a customer's details
2
Select the destination type
Choose Crypto wallet. This form is shorter than the other two.
Choosing Crypto wallet as the destination type
3
Set the beneficiary type and counter party
Beneficiary type says whether the recipient is an Individual or a Business.Counter party says who your customer is paying. First party (self) means they are paying themselves. Third party means they are paying someone else. This drives the compliance checks, and third party payouts may bring extra ones depending on the country.
Setting the beneficiary type and counter party
4
Choose the beneficiary country
Under Beneficiary country, set the recipient’s Country. There is no currency or payment method to choose here.
Selecting the beneficiary country
5
Add the destination wallet
Give the Network, the Token, and the Wallet address. Not every token exists on every network, so the token options change with the network you pick.
The destination wallet details
Check the wallet address carefully before you save. Funds sent to a wrong address cannot be recovered.
6
Fill in the account holder information
Give the recipient’s First name, Last name, Email, and Phone, then their Account holder address: street, city, country, state, and postal code.
Account holder information and address
7
Complete the compliance information
Give the Nationality, Transaction purpose, Occupation, and Relationship. Fewer details are needed here than on a bank or e-wallet payout, and there are no government ID fields.The relationship options change depending on whether your customer and the recipient are individuals or businesses. See Sender and receiver relationships for which combinations are allowed.
The compliance information section
8
Set your fee
Under Developer fee, set what you charge on top of each payout. You can set a Fixed fee, a Percentage fee, or both. When you set both, they are added together.
The developer fee section
9
Create the beneficiary
Select Create beneficiary to submit.There is no deposit and refund configuration on this form, because the payout is already going out as crypto.
How do I make a payment to my bank account and e-wallet?
Payouts are funded in crypto. Every beneficiary is issued its own Liquidation address, and money you send to that address is converted and paid out to the beneficiary’s bank account or wallet.
1
Open the beneficiary
On the Beneficiaries tab, select the beneficiary you want to pay. The Details panel opens.
2
Copy the liquidation address
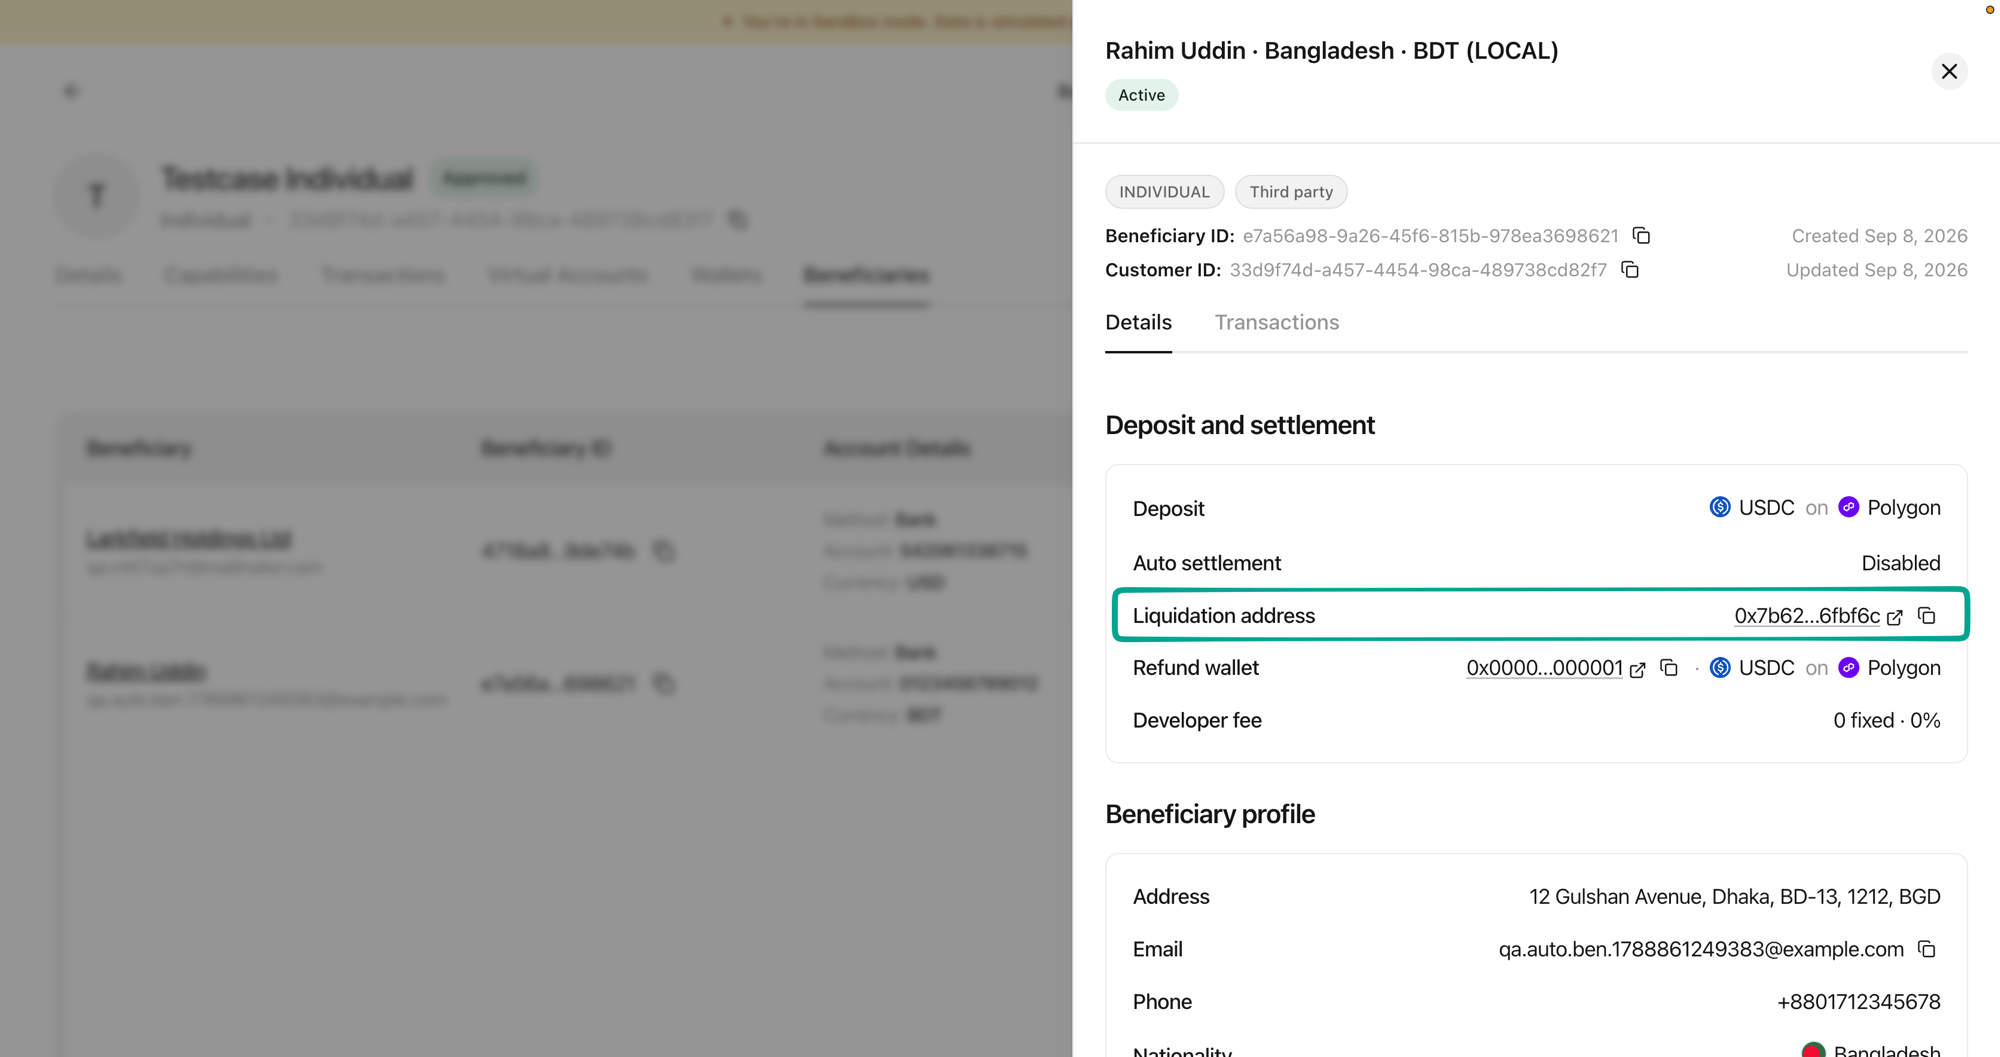
Under Deposit and settlement you will find the Liquidation address, along with the Deposit token and network the address expects. Copy the address.
The liquidation address on a beneficiary's details
Send only the token and network shown under Deposit. Anything else may be lost.
3
Send the crypto
Send the amount you want paid out to that liquidation address, from whichever wallet you fund payouts with.
4
We convert and settle it
Once the crypto arrives, we convert it to the beneficiary’s currency, take the fees, and pay the remainder to their bank account or e-wallet. What the beneficiary receives is the converted amount after fees.
5
Follow the payment
Open the Transactions tab on the beneficiary to see the payout as it progresses.
The beneficiary’s Details panel also shows whether Auto settlement is enabled. With it on, the payout is sent as soon as the crypto arrives at the liquidation address, so sending the crypto is the only step you take. With it off, we hold the funds until you release them.
This applies to bank account and e-wallet beneficiaries. A crypto wallet beneficiary has no liquidation address, because there is nothing to convert.
One reason is that the recipient is already there. The same recipient cannot be added twice for one customer, so when the destination details match a beneficiary that already exists, the form does not save and you are told it could not be created.These are the details compared:
Destination
What is compared
Bank account
The account scheme and number, plus the routing scheme and number
E-wallet
The wallet provider and number
Crypto wallet
The wallet address and the network
If that happens, the beneficiary you need is already on the Beneficiaries tab. Use that one instead of creating another.
Need a hand with your first beneficiary?Contact us in your dedicated Slack channel and we will walk through it with you.
⌘I
Assistant
Responses are generated using AI and may contain mistakes.