

Before You Start
Onboarding Flow
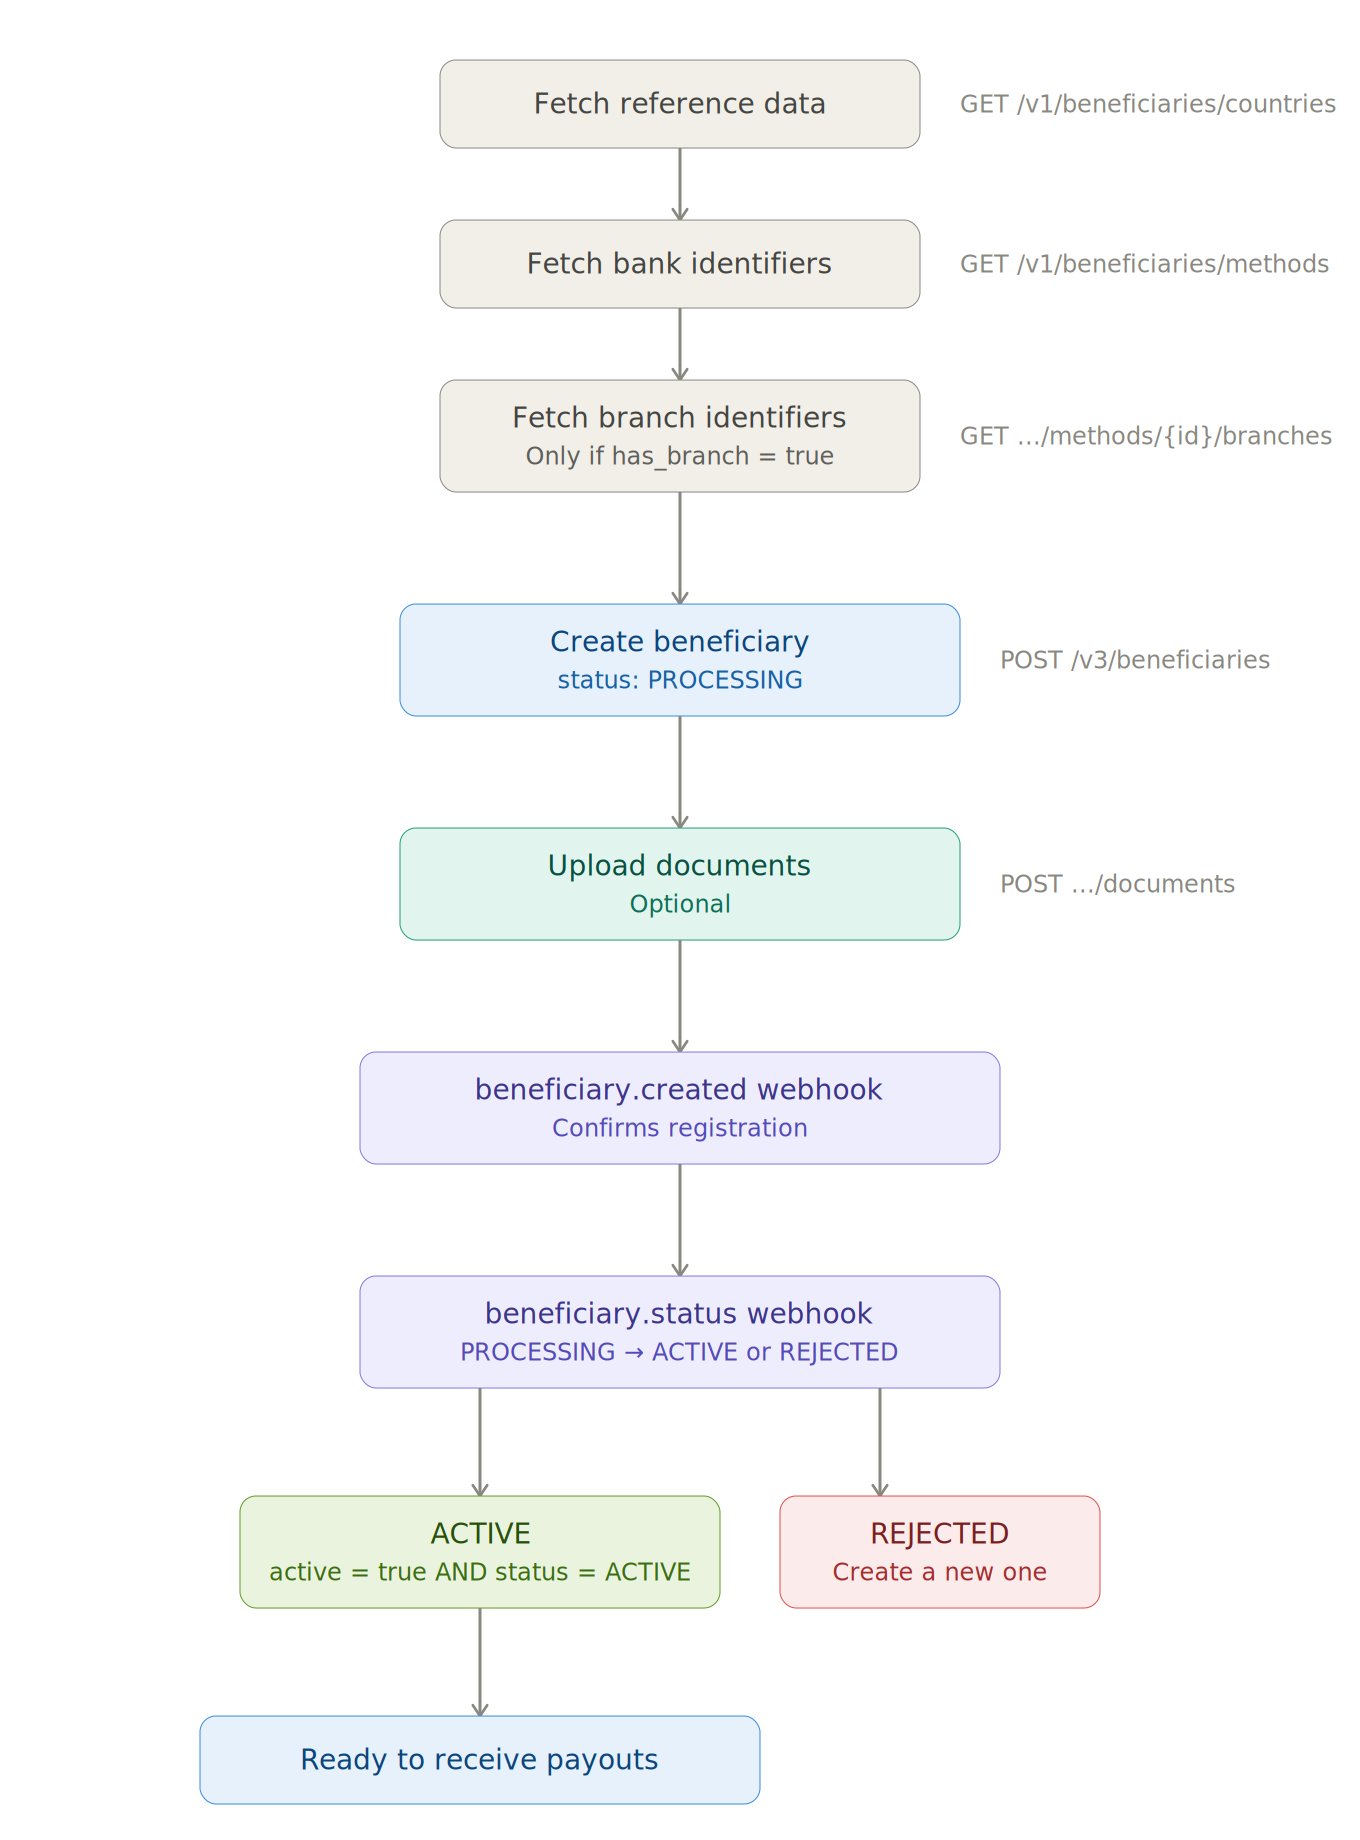
Step 1: Fetch Reference Data
Three catalogue endpoints feed into beneficiary creation. These are V1-only and no newer versions exist.1a. List Supported Countries
code (ISO alpha-3) → maps to country and currency in the create call. available_methods tells you whether to build a bank form or e-wallet form.
1b. List Bank / E-Wallet Identifiers
id → used as bank_routing[].number with scheme BANK_IDENTIFIER. Check has_branch. If true, proceed to 1c.
1c. List Branch Identifiers (conditional)
Only call this ifhas_branch is true from Step 1b.
id → used as bank_routing[].number with scheme BRANCH_IDENTIFIER.
Step 2: Create the Beneficiary
Request Structure
Counter Party
Thecounter_party field declares the relationship between the customer and the beneficiary receiving the payout.
This field is required in V3 and drives compliance screening. Third-party payouts may be subject to additional checks depending on the corridor.
Account Holder
Theaccount_holder object is polymorphic based on type.
Individual:
Account Holder Address
state uses ISO 3166-2 subdivision codes. Fetch valid values from GET /v1/countries/{country_code}/subdivisions.
Receiver Metadata
transaction_purpose_id → fetch from GET /v1/transaction-purposes?type=INDIVIDUAL or ?type=BUSINESS. occupation_id → fetch from GET /v1/occupations.
Relationship values by account holder type:
Relationship enums varies by the sender and receiver types.
Lern more about sender and beneficiary relationship.
Developer Fee
Your markup on each payout through this beneficiary.fixed + (percentage × payout amount).
Deposit & Refund Instructions
Deposit instruction defines how source funds arrive:Only Polygon rail and USDC currency is available now. USDT is coming soon.
Settlement Config (optional)
auto_settlement: true): Fin.com initiates the fiat payout automatically when crypto is received in the beneficiary’s liquidation address.
Programmatic settlement (auto_settlement: false): You trigger the payout yourself using the Settle a Transfer endpoint or the Execute Batch Transfer endpoint.
Programmatic settlement with prefunded balance
If you maintain prefunded balances with Fin.com, you must always trigger payouts programmatically. Use either the Settle a Transfer endpoint or the Execute Batch Transfer endpoint. This applies regardless of the beneficiary’sauto_settlement value (true or false).
Programmatic settlement without a prefunded balance
Setauto_settlement to false for the beneficiary. Fin.com will hold the crypto in the liquidation address until you trigger the payout using either the Settle a Transfer endpoint or the Execute Batch Transfer endpoint.
Learn more about Funding & Balances.
Pre-funding is required for all local currency payouts (e.g., BDT, INR, EUR).
Destination: Bank Account
Add three fields:bank_account, bank_routing, and bank_address.
bank_account:
bank_routing:
An array. Most corridors need multiple routing entries.
bank_address:
Destination: E-Wallet
Replace the three bank fields with a singlee_wallet object.
scheme values come from the name field in the List Bank Identfier response. Select E_WALLET in query parameter to get the list of E-Wallets.
Response
beneficiary_id. You’ll need it for payouts, document uploads, and detail lookups.
De-Duplication Rules
Fin rejects duplicate beneficiaries with a409 Conflict. Uniqueness is determined by:
The
409 response includes the existing beneficiary_id so you can reuse it instead of creating a new one.
Country-Specific Validation
Step 3: Upload Documents (Optional)
attachments array in Create a Transfer payload.
Step 4: Verify & Confirm
Fetch Beneficiary Details
Eligibility for Transactions
A beneficiary can receive payouts only when both conditions are met:
These are independent fields.
active is your on/off switch. status reflects Fin’s validation outcome.
status values:
A newly created beneficiary starts in
PROCESSING with active = true. Listen for the beneficiary.status webhook to know when Fin transitions it to ACTIVE or REJECTED.
Managing Beneficiaries
List All Beneficiaries for a Customer
Deactivate / Reactivate
active flag only. It does not change status. Setting active: false makes the beneficiary ineligible for payouts even if status is ACTIVE. Set active: true to re-enable.
Note: If Fin has setstatustoREJECTEDorINACTIVE, the beneficiary cannot transact regardless of theactiveflag. ForREJECTEDbeneficiaries, create a new one instead.
Webhooks
Subscribe to these events to track beneficiary lifecycle changes asynchronously.
All webhook payloads include HMAC signatures for verification. Learn how to verify webhook signatures.
beneficiary.created
Triggered when a new beneficiary is created in the system. Use this to confirm the beneficiary was registered and to capture thebeneficiary_id on your end.
status is PROCESSING. Wait for the beneficiary.status webhook before attempting any payouts.
beneficiary.status
Triggered when a beneficiary’s status changes. This is the primary webhook you should listen for to know when a beneficiary is ready to receive payments. Status values:
Common transitions:
beneficiary.liquidation.deposit
Fires when any transfer hits the liquidation address. Useful for confirming funds arrival before payout execution.Error Reference
V3 vs V2: Key Differences
Create Beneficiary
Fetch Beneficiary Details
Recommendation: Use V3 for all new integrations. V2 remains available but lacks counter-party tracking and the explicit status field.
What’s Next
With the beneficiary onboarded, you can:- Send USDC to the beneficiary liquidation address
- Send a single payout →
POST /v1/transactions/transfer-payout, if the settlement_config is false. - Send batch payouts →
POST /v1/batch/transactions/commit, if the settlement_config is false. - Preview fees →
POST /v1/fee-calculation(passbeneficiary_idfor developer-fee-aware calculations) - Check FX rates →
GET /v1/fx-rate?currency_code={code}